Agronomy Update
Aug 03, 2026
Diagnosing Late-Season Nutrient Deficiency in Corn
Once we hit the late-summer stretch of August, corn management can slip into autopilot: keep water on schedule, check ear development now and then, and make sure nothing crazy shows up like a spider mite infestation.That's understandable — for most of you corn isn't the only crop, and wheat and pulses coming off pull your attention everywhere else. But don't lose focus. This is one of the best times of year to walk your corn and read what the crop is telling you about how the season has gone.
By that I mean a real field inspection, not the drive-by nod of "looks good" or "yep, a little firing up already." There's a more systematic way to look at a corn crop, and it gives you a much better picture than writing off dying bottom leaves as just that time of year.
Firing up is a message, not a date on the calendar
Leaves dying from the bottom of the plant is normal, but the plant is telling you something. Bottom leaves don't die simply because they're shaded at the base of the canopy. They die because the plant is pulling nutrients out of that older tissue and moving them to the ear — and it's doing that because it can no longer pull what it needs out of the ground fast enough. In other words, firing is a nutrient deficiency.
Two macronutrients are behind almost all of the firing you see in late summer: nitrogen and potassium. At a glance the symptoms are identical — bottom leaves yellow, go necrotic, and the damage works its way up the stalk. Up close, they're easy to separate.
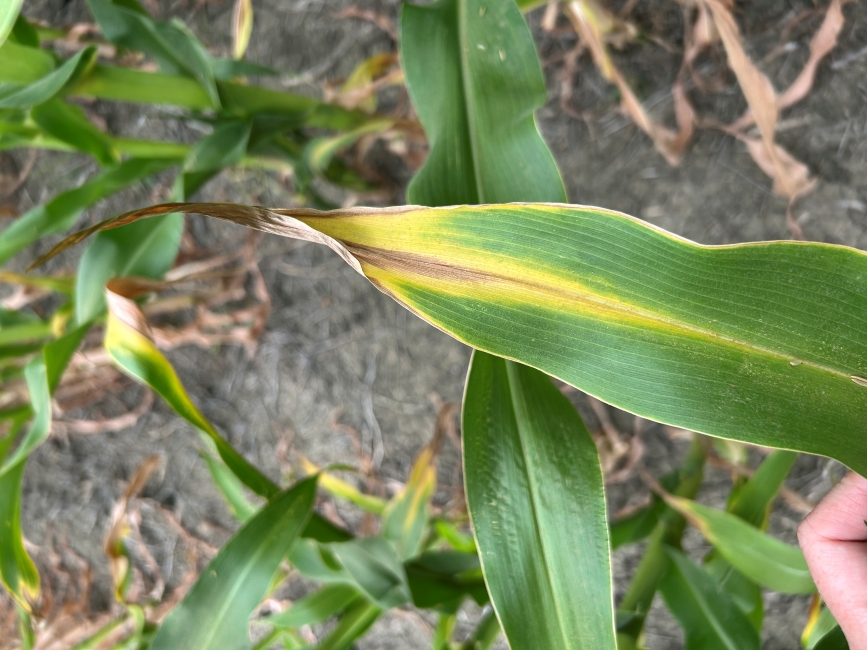
Nitrogen yellows along the midrib, usually starting at the leaf tip and running back toward the stalk in a V shape (image below). The yellowing spreads outward from the midrib, then browns.
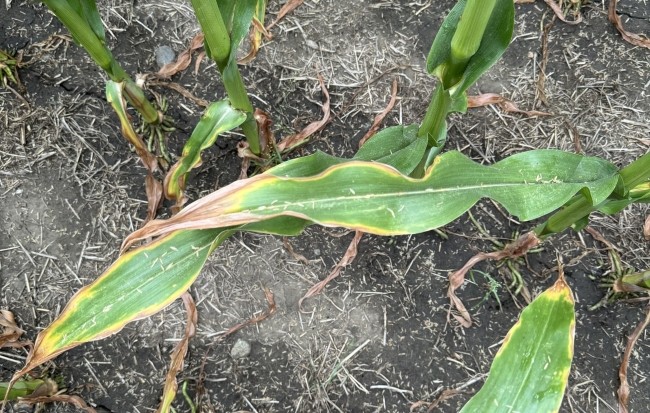
Potassium yellows on the outer leaf margins first, then works inward toward the midrib (image below).
These are subtle differences, but once you see it you can't unsee it and from then on you'll always know which nutrient is behind the firing in front of you.
Why the difference matters
Both N and K are macronutrients, so the plant's demand for them is among the highest of anything it pulls out of the soil. That's about where the similarities end.
Nitrogen is mobile in the soil and leaches away from the root zone easily in coarser soil types. It's used in essentially every plant process including building roots, leaves, and ears and, importantly, it ends up in the grain. Nearly 60% of the nitrogen a corn plant takes up leaves the field in the grain. So even though your last nitrogen application was probably months ago, what you applied is still building kernels right up to maturity.
That makes the timing of nitrogen deficiency a report card on your fertility program. If you're seeing it during early ear development, the plant will strip nitrogen out of the oldest growth and move it to the ear to keep kernels filling as long as it can but that usually comes at the expense of both yield and stalk integrity. Ideally you don't want to see any nitrogen deficiency until you're nearing maturity.
I realize most of you have already spent your budget on this corn crop and will let it ride. Fine — but take note of when you see nitrogen deficiency and where the crop was developmentally when it showed up. Early, or very late? Then compare that against how yield met your expectations. I think you'll find the relationship between the two is pretty tight.
Potassium tells a different story
Potassium's main job is stomatal regulation. Stomata are pores on the leaf surface where plants take in carbon dioxide and release oxygen and water vapor. So this nutrient plays a central role in managing water movement through the corn plant. When potassium runs short, the plant loses the ability to regulate water flow and can start showing drought stress even when soil moisture is adequate.
Once water movement slows, so does the uptake of every other nutrient, since water movement through the xylem is how nutrients travel. It becomes clear in a hurry that you won't maximize yield potential when that happens.
The good news: roughly 70% of the potassium taken up stays in the residue and never leaves the field with the grain. As long as your fertility is adequate, soil mining is relatively minimal.
If you do see potassium deficiency, be diligent about soil sampling those spots — you may be surprised by what comes back. The generally accepted critical level is 150 ppm potassium, meaning below that threshold you won't meet the plant's needs. But visible potassium deficiency shows up regularly at soil test levels well above 150 ppm. A lot of that comes down to the type of clay in your soil, and other factors play in too.
The point: when you see potassium deficiency, mark where it was, pull a sample there, and record the soil test K. That's how you tighten up your field-by-field potassium recommendations.
The takeaway
There's more behind the firing up you see going into late summer than the calendar. With a careful eye, you can determine which nutrient is causing it and, in turn, identify the places in your fertility program worth addressing. Now that you've looked
— back to harvest.
Kyle Okke, CCA
Agile Agronomy LLC
Agronomists Happy Hour Podcast
Desiccants - Choose the Right Product
We are well into lentil and pea desiccation, and with the challenges of completing in-crop herbicide applications during a wet and windy June, there may be durum and wheat fields where a pre-harvest herbicide pass could help with weed dry down and facilitate combining.Each pre-harvest weed control or desiccation product has its own benefits and limitations, and very large weeds are always a challenge to kill. A successful pre-harvest pass relies on selecting the right product for the job, using the appropriate adjuvants and water rates and favorable weather.
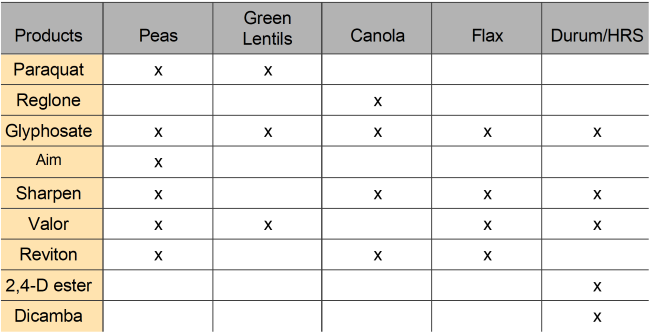
The table below indicates which products or chemistries are labeled for use pre-harvest in each crop (Source: 2026 NDSU Weed Guide)
Paraquat, sold as Gramoxone, Helmquat and Solera, is our go-to choice for pulse crops. With a fast dry down rate, and no issues with herbicide resistance this is probably your best bet for peas, lentils and chickpeas. Paraquat is a contact herbicide, meaning it doesn't move systemically through the plant. That is why coverage is so important. Always use at least 15, and better yet 20, gallons of water per acre and add a non-ionic surfactant like R11 or Last Chance Pro. We also recommend using a deposition agent like Interlock. In addition to reducing drift, it also helps to get the herbicide down through the canopy.
Paraquat applicators are required to complete additional training every three years. The National Pesticide Safety Education Center discontinued online and in-person Paraquat Dichloride Training for Certified Applicators in 2025. Training is still offered online through Syngenta.
Glyphosate or Sharpen are alternatives for pre-harvest weed control. Note that Sharpen is NOT registered for use on green lentils due to discoloration that can downgrade crop quality. Research from Dr. Brian Jenks (NDSU North Central REC) has shown that the combination of Sharpen and glyphosate can improve desiccation of red root pigweed and lambsquarters compared to Gramoxone (paraquat). Keep in mind that glyphosate does not provide the rapid dry-down associated with paraquat and may require up to two weeks before the crop is ready to harvest.
Seed harvested from fields treated with Sharpen or glyphosate before harvest will have reduced vigor. During the final stages of crop maturation, developing seed continues to draw nutrients from the rest of the plant. When systemic herbicides are applied at this stage, the active ingredients can also be translocated into the developing seed, resulting in reduced germination and seed vigor. Because of this, grain treated with these products should not be saved for seed.
A combination of glyphosate and 2,4-D (ex. Shredder E-99), with MSO and AMS, is commonly used for pre-harvest weed management in wheat or durum. However, this will not be effective in fields where the target is glyphosate resistant kochia. Dicamba can provide some additional burndown of kochia, but because weeds are often very large by harvest, complete control is unlikely. At best, dicamba may help dry the plants enough to improve harvest efficiency.
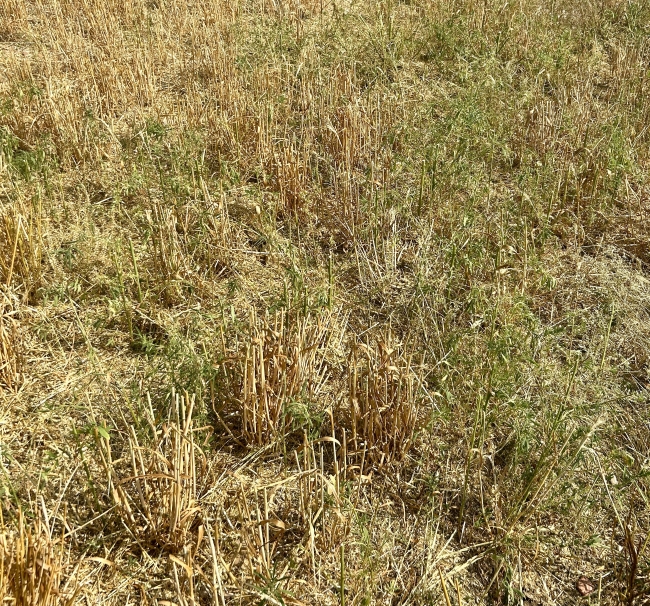
The photo above, taken last week, shows green kochia remaining in a harvested field. Kochia typically produces seed from mid- to late August, meaning these plants may still complete their life cycle and contribute seed to the soil weed bank. In this situation, a timely post-harvest herbicide application can help reduce weed pressure for next season.
Successful pre-harvest weed management starts with selecting the right product for the crop and target weeds, applying it with adequate water volume and the proper adjuvants, and timing the application correctly. While no product will completely control large, mature weeds, an effective pre-harvest program can improve harvest efficiency. Grain treated with glyphosate or Sharpen before harvest should be segregated from grain intended for planting, as these systemic herbicides can reduce seed vigor and germination. As always, follow product label directions, including crop staging and pre-harvest interval requirements, to ensure effective weed control and maintain crop quality.
Dr. Audrey Kalil, CCA
Agronomist/Outreach Coordinator
Fight Stored Grain Insects with an Integrated Pest Management Program
Stored grain insects destroy up to 10% of the U.S. wheat crop every year during post-harvest infestations, costing the industry upwards of $2.5 billion a year.Controlling stored product pests, including weevils and Indian meal moths, is the first step to protecting stored commodities and profits. For the most effective control of grain bugs, incorporate chemical control into a comprehensive integrated pest management (IPM) program. An effective IPM program is designed to protect grain quality from weather, rodents, insects and molds.
Thoroughly Clean Facilities and Grain Storage Units
Before any new grain can be loaded in, it’s crucial to thoroughly clean empty grain bins inside and outside of the structure, removing any old commodity. Once completed, there should be no visible sign of the grain last stored in the structure. This includes cleaning grain handling equipment. While inspecting your facility, keep an eye out for any damage, especially cracks or holes, as they can be an easy entry way allowing grain insects into your stored grain. After this preparation, you can incorporate stored grain protectants. Diacon®-D IGR can be used as an empty bin treatment, prior to loading in new grain, to help eliminate any remaining insect populations and prevent future generations from emerging.
Ensure Proper Grain Loading
After thoroughly cleaning and following the proper sanitation procedures for your grain bins and facilities, it’s time to bring in your new commodity. This loading step is where to treat the incoming grain based on your storage requirements. Directly applying grain protectants such as Diacon®-D IGR to treat the incoming grain stream controls grain bug infestations and protects your new commodity. While treating the product, it is essential to allow for optimal circulation by evenly spreading the grain as it enters the storage facility.
Handling Diacon Safely
Diacon®-D IGR should be handled with care. Avoid breathing dust and prevent contact with the skin, eyes and clothing. Applicators should wear a dust mask, chemical-resistant gloves, and protective eyewear, and wash thoroughly after handling the product. Contaminated clothing should be removed and washed before reuse. As with all pesticides, always read and follow the product label for complete use directions, safety precautions, and personal protective equipment (PPE) requirements.
Place an Emphasis on Stored Grain Aeration
Grain insects thrive in warm, moist habitats. To slow down their reproduction rate and reduce mold growth, keep your grain cool and moisture free. Make sure to properly cool stored grain and keep it leveled, rather than peaked, allowing for better air movement.
Implement a Grain Monitoring System
Don’t let all your hard work go to waste! Stay ahead of future problems and insect infestations by regularly keeping track of your progress and checking for heating or any signs of infestations in the grain. Temperature probes, insect traps and core samplers are perfect tools to help protect your bottom line.
For more tips, tricks and helpful information, visit BugFreeGrains.com
Natalie Tokach
Regional Sales Manager
Grain/Specialty Ag Products
Central Life Sciences