Agronomy Update
Fall Nitrogen Considerations
We are well into October, so it’s a good time to talk about fall nitrogen. Logistically, fall application gives you a head start on spring work, and nitrogen is generally at its cheapest for the coming season this time of year. Here are the things I look at when deciding when to pull the trigger on fall nitrogen, which fields to pick, and which product is best to use.
When: Let Soil Temperature Decide
Let’s start with the when. The biggest driver is soil temperature, because it controls soil microbial activity. Nitrogen starts out in the soil as ammonium (NH4+).
Ammonium carries a positive charge, the opposite of the soil’s negative charge, so it sticks to soil particles like a magnet. That’s a good thing: it keeps the nitrogen right where you want it, in the top layer of soil. As long as it stays in the ammonium form, it stays put through any rains before freeze-up and through snowmelt and rains in early spring.
The problem is that when soil temperatures are above 50°F, soil microbes are active, and they convert ammonium into nitrate (NO3−). Nitrate carries the same negative charge as the soil, so the soil can’t hold it, and any rain before freeze-up or after spring thaw will start leaching it deeper into the soil profile. That’s why it pays to wait until the soil is cool enough that microbial activity slows way down for the season, so your nitrogen investment stays put.
In practice, check the soil temperature at the 4-inch depth at sunup (around 7:00 a.m. right now). Once it’s at or below 50°F and has hung there for about a week, you’re ready to go get nitrogen applied. If you don’t have a soil thermometer, the nearest NDAWN weather station reports soil temperatures daily.
Which Fields: Leave the Sand for Spring
Next, which fields. Not all ground is suited to fall-applied nitrogen. You’ve probably heard the term cation exchange capacity, or CEC, thrown around on everybody’s favorite Sunday morning farm TV program, but I’m here to simplify it: loams and clays are fine for fall nitrogen; sandy soils should wait until spring. Sandy soils don’t have the capacity to hold much nitrogen, and the leaching risk is too high, so it’s best to wait until spring to fertilize sandy ground.
Which Product: Anhydrous, Urea, or UAN
Now to the products. The three most commonly used nitrogen fertilizers are anhydrous ammonia (82-0-0), a gas; urea (46-0-0), a solid prill; and UAN (28-0-0), a liquid. For fall application, the best products and practices are banding anhydrous ammonia or urea, or broadcasting urea and working it in. Figure 1 shows why.
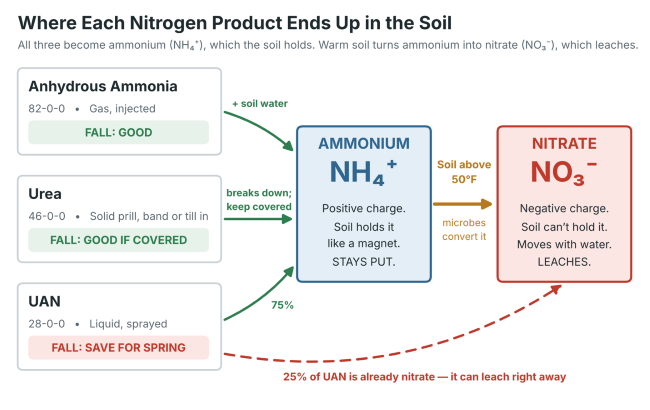
Figure 1. Anhydrous ammonia, urea and UAN all end up as ammonium (NH +), which the soil holds. Warm soil converts ammonium to nitrate (NO −), which leaches, and one-quarter of UAN is nitrate from the start.
Anhydrous ammonia (NH3) is a gas. When it meets water in the soil, it pulls a hydrogen (H) from the water (H2O) and becomes ammonium (NH4+), which, as mentioned earlier, is stable and held by the soil.
Urea ends up in the same place as anhydrous ammonia but takes a slightly different, slower pathway. Once it dissolves, an enzyme in the soil breaks the urea molecule down into carbon dioxide (CO2) and ammonia (NH3) gas. That NH3 then finds soil water and is held by the soil as NH4+. If urea sits on the surface, this conversion still happens, but with no soil covering it, much of the NH3 gasses off into the air before it can become NH4+. That’s why incorporation through banding or tillage is important, and it needs to be at least 2 inches deep.
UAN is always a popular option to consider because you can apply it with the sprayer you already own, which is much faster than banding anhydrous ammonia or urea, or hiring urea spread and then working it in. But let me spell out what UAN (28-0-0) is: urea ammonium nitrate solution. UAN contains three forms of nitrogen: 50% urea, 25% ammonium and 25% nitrate (Figure 2).
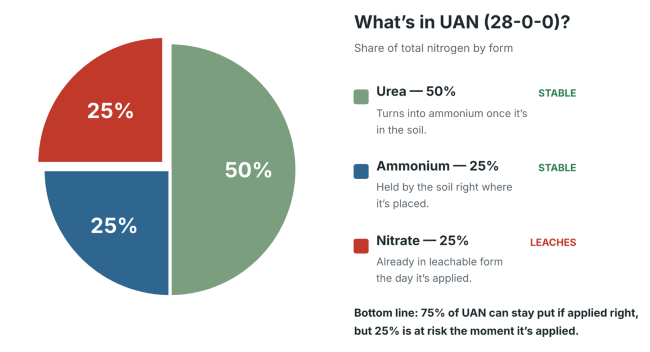
Figure 2. The three forms of nitrogen in UAN (28-0-0). The 25% that is already nitrate is exposed to leaching from the day it is applied.
That means 75% of UAN is stable if it’s applied properly, but 25% is already in the nitrate form and is prone to leaching immediately. That’s fine for a spring application, but in the fall, when you want nitrogen to stay right where you placed it until spring, it’s less than desirable. So it’s generally best to save UAN for spring and leave it out of your fall plans.
Bringing It Together
Fall nitrogen is a good tool, but you have to choose the right product, the right fields and the right time. Stick with anhydrous ammonia or urea, put it on soils heavier than sand, and wait until morning soil temperatures have stabilized at 50°F or lower. Then it’s go time. Remember to band or incorporate at least 2 inches deep. If you can’t band or till and want to surface-apply urea, wait at least two weeks after it’s safe to band nitrogen, and get it broadcast before the soil freezes.
Kyle Okke, CCA
Agile Agronomy
Fall Canada Thistle Control
We have been seeing a lot of Canada thistle in fields, and this perennial weed can be challenging to control in-crop. We rely heavily on clopyralid-containing herbicides, such as Weld and Stinger, in small grains, flax, and canola. However, using these products can limit our ability to grow pulse crops the following year due to rotation restrictions.
One of the best opportunities to manage Canada thistle is in the fall, when we can take advantage of the biology of this perennial weed and target its extensive root system.
Summer: Prevent New Growth and Seed Production
New Canada thistle patches can start from seeds dispersed the previous fall. Established patches also produce new shoots in early spring as the underground root system begins to grow.
These shoots can be controlled effectively with herbicides in several crops, but in-crop options are limited in pulse crops. Shoots that survive herbicide applications continue to develop throughout the summer. By midsummer, surviving plants may produce small pink or purple flowers, followed by seeds with fluffy hairs that allow them to disperse by wind and establish new patches.
Summer control is important for preventing seed production and reducing the spread of existing patches. However, controlling the aboveground growth alone may not eliminate the established underground root system.
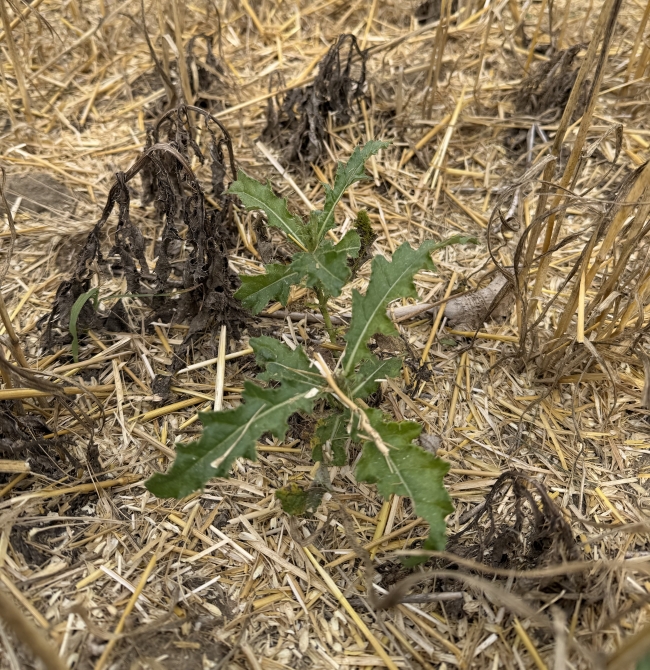
New Canada thistle shoots emerge following successful in crop control. Image taken in September.
Fall: Target the Root System
In the fall, Canada thistle prepares for winter by moving carbohydrates and other resources from its leaves into its roots and underground rhizomes. This process makes fall an important opportunity to control the root system with systemic herbicides.
Glyphosate applied while Canada thistle is actively growing can move from the leaves into the roots, helping reduce root survival and regrowth the following spring. Plants need sufficient healthy green leaf area, and applications should be made before a killing frost or other conditions such as drought stop active growth.
Once the days are getting shorter and the nights are getting colder, apply a quart or more of Roundup (ex. RT3) per acre. If timed correctly, this can be tank mixed with your fall residual herbicide.
Keep Up Control
Canada thistle seedlings are generally easier to control than established patches. Once a patch develops, its extensive root system can extend up to six feet into the soil, with as much as 90% of that below the top foot. These underground roots and rhizomes allow the plant to recover even after the aboveground growth has been removed.
Cleaning up established patches can take three to five years of consistent management. Neglecting summer control to preserve pulse crop options can allow patches to expand, produce seed, and become more difficult to manage over time. A consistent fall control program, combined with in-crop clopyralid applications during the small grain, canola, and flax phases of the rotation where appropriate, can help bring Canada thistle infestations under control more quickly. Continue monitoring fields and treat regrowth as needed.
Finally, don't overlook field edges. Mowing borders before Canada thistle plants produce seed can help limit the spread of new infestations into the field. A consistent, multi-year approach is the key to keeping this persistent weed in check.
John Salvevold, CCA
Agronomy Division Manager
2027 Pea and Lentil Acres: Consider Root Rot Risk
This past season brought a weather roller coaster. A cold and dry April led many to delay planting until mid to even late May when conditions warmed. Lentil plants in the early to mid vegetative growth stages then experienced heavy rainfall and cooler than average temperatures in June, which was followed by hot and dry conditions in July.
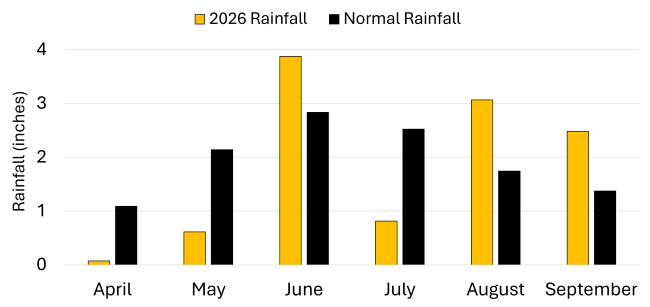
Total rainfall by month in 2026 compared to 30-year Normal. Data Source: NDAWN
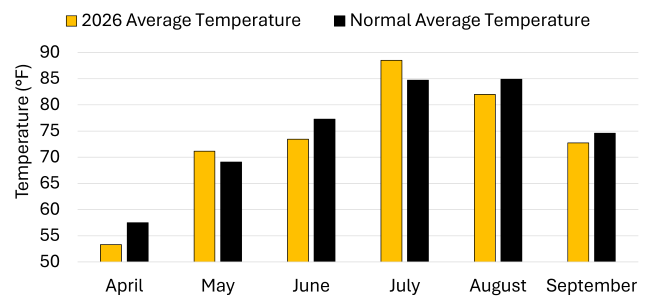
Average temperature by month in 2026 compared to 30-year Normal. Data Source: NDAWN
Late planting of peas or lentils into warm soils followed by heavy rainfall creates ideal conditions for infection by Aphanomyces euteiches, our most problematic root rot pathogen in these crops. This pathogen is an oomycete, also known as a water mold, and produces swimming spores during rainfall events. These infect roots and kill the tissue, resulting in brown discolored roots, with few lateral roots or nodules (image below).
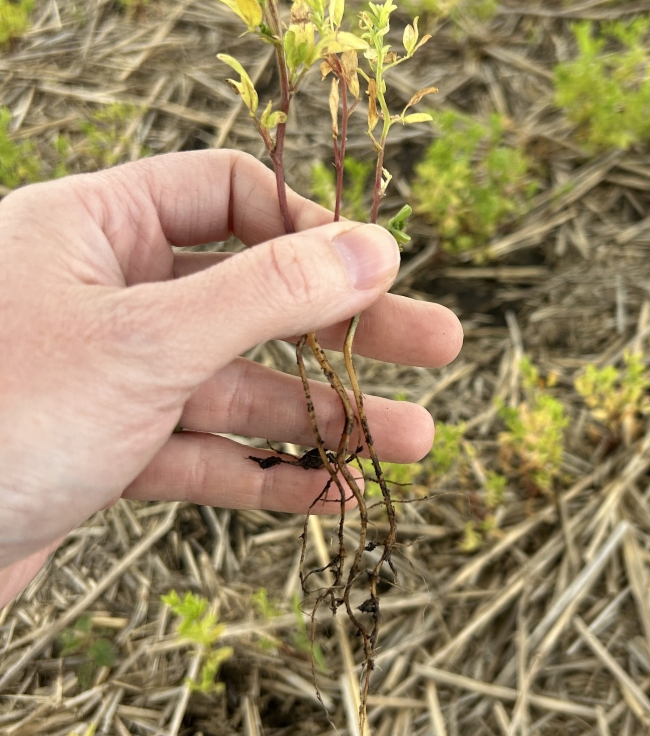
Root rot symptoms caused by co-infection by Aphanomyces and Fusarium in lentils.
Once the root system is compromised, the plant struggles to take up water and nutrients. This means that root rot can cause yield loss even if infection is followed by hot and dry conditions. Stressed plants are also more susceptible to another root rot pathogen: Fusarium. While Aphanomyces can kill plants, resulting in bare patches, less severe symptoms such as stunting and yellowing can be mistaken for herbicide injury or drought stress.
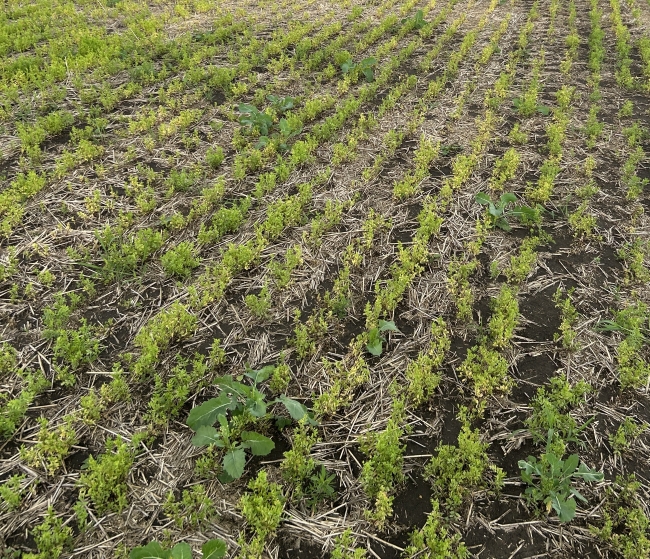
Above ground symptoms caused by root rot. Picture taken in late June.
Aphanomyces can survive for a decade or more in the soil. Even fields that have not been planted to peas or lentils for many years can be at risk if there is any history of root rot in that field.
While I did not hear widespread reports of root rot, there were a few fields that had severe disease and tested positive for Aphanomyces and Fusarium root rot pathogens. Overall most folks were disappointed with lentil yields this year, and it is possible that below ground disease contributed to plant stress and yield loss.
The National Agricultural Genotyping Center in Fargo has a soil and root test available for three root rot pathogens that infect peas and lentils: Aphanomyces euteiches, Fusarium avenaceum and Fusarium oxysporum. The DNA based test can determine both the presence and the quantity of the pathogen DNA in the sample.
Regularly conducting soil and root testing in pulse crop fields can help establish a history of disease, much like we track soil nutrients over time. This might facilitate rotation decisions, and avoidance of high risk fields.
The minimum rotation recommended for peas and lentils in fields with no root rot history is four years. That is three years in between either a pea or lentil crop because they are both susceptible. This is to try and avoid the build up of root rot pathogens in the soil, much like we try prevent weeds from contributing seed to the weed seed bank. Soybeans and chickpeas are not susceptible to Aphanomyces, and are rotation options if you are still looking for nitrogen fixing crop.
If you have a positive test for Aphanomyces or have had severe root rot in a field then a longer rotation of 6 or even up to 8 years is recommended. There are cases where even after waiting 10 years, growers have experienced severe losses due to Aphanomyces root rot.
Crop rotation must be stacked with other management techniques like using a fungicide seed treatment and planting early into cool soils to reduce yield loss due to disease. There are some pea varieties with tolerance to root rot, and those have shown to greatly improve yield under root disease pressure.
If you are interested in how to test for root rot pathogens please feel free to reach out. While regular testing for diseases isn't yet standard practice on farms, it could help explain why and how we have lower than expected yields in peas and lentils and facilitate future rotation and management decisions.
Dr. Audrey Kalil, CCA
Agronomist/Outreach Coordinator